Use our Fixed Widget for WordPress plugin to create sticky widgets that stay in the visible screen area even when users scroll your website up or down. Sticky widgets are noticed by visitors and can get a significantly higher click-through rate. Therefore, this feature is especially useful for ads or other items that visitors should ideally interact with.
Please note that there are more positions and options to create fixed ads in the Sticky Ads add-on.
Table of Contents
How to make elements sticky
This manual will show you how to create sticky widgets in WordPress. This manual will show you how to create sticky widgets in WordPress.
The essential requirement for this highly effective conversion booster is the free plugin Fixed Widgets for WordPress. You can download and install it like any other WordPress plugin.
After activating the plugin:
- Navigate to Appearance > Widgets.
- Open the block you want to fix to the screen when someone scrolls your website.
- Enable the Fix widget checkbox to activate the sticky function for the block.
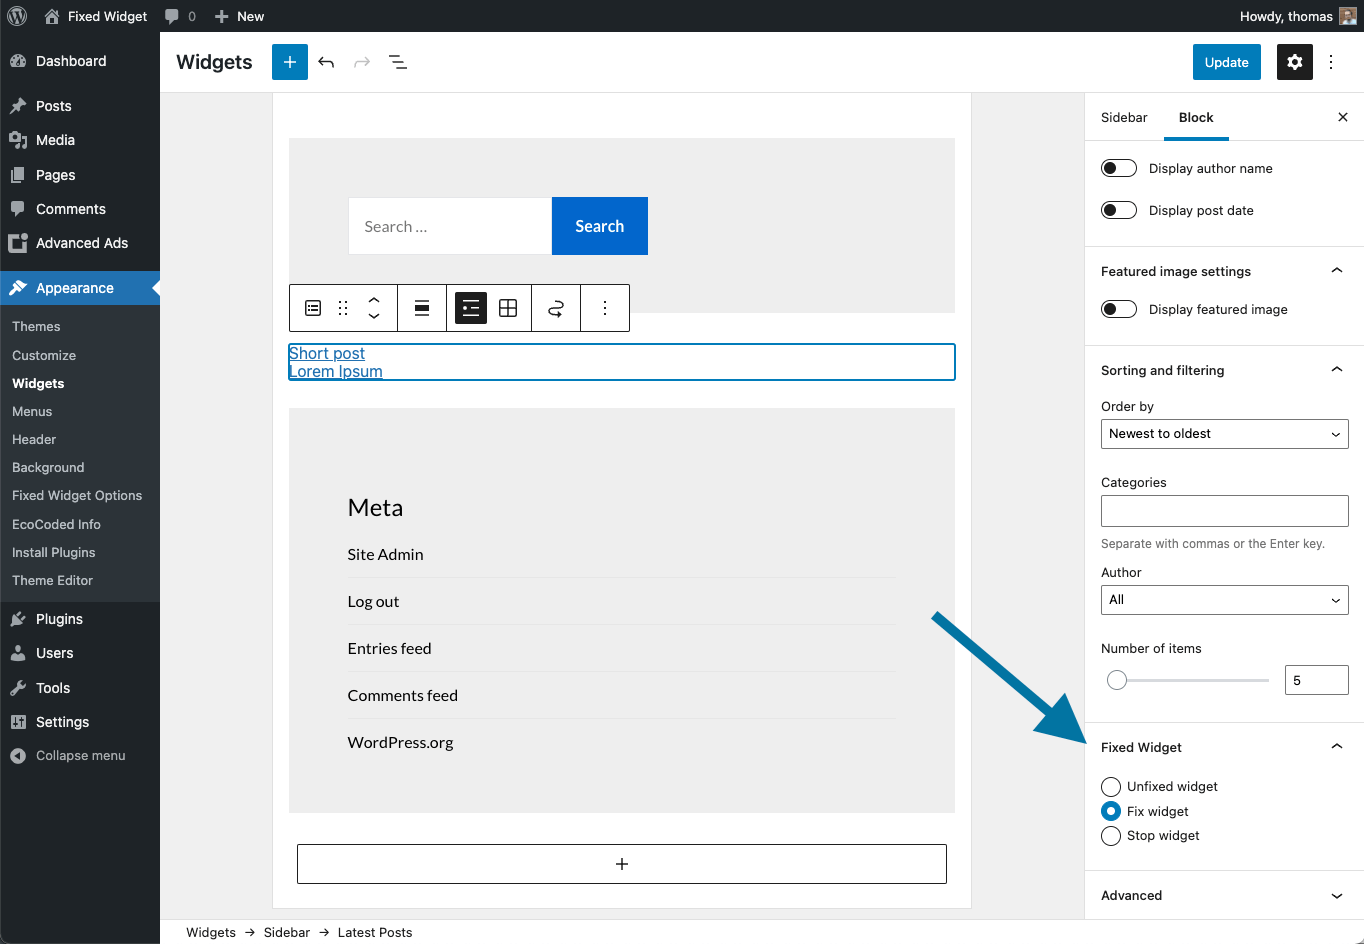
Tip: if you want to fix multiple consecutive widgets then wrap them using the Group block and apply the Fix Widget option to the group instead of each widget on its own.
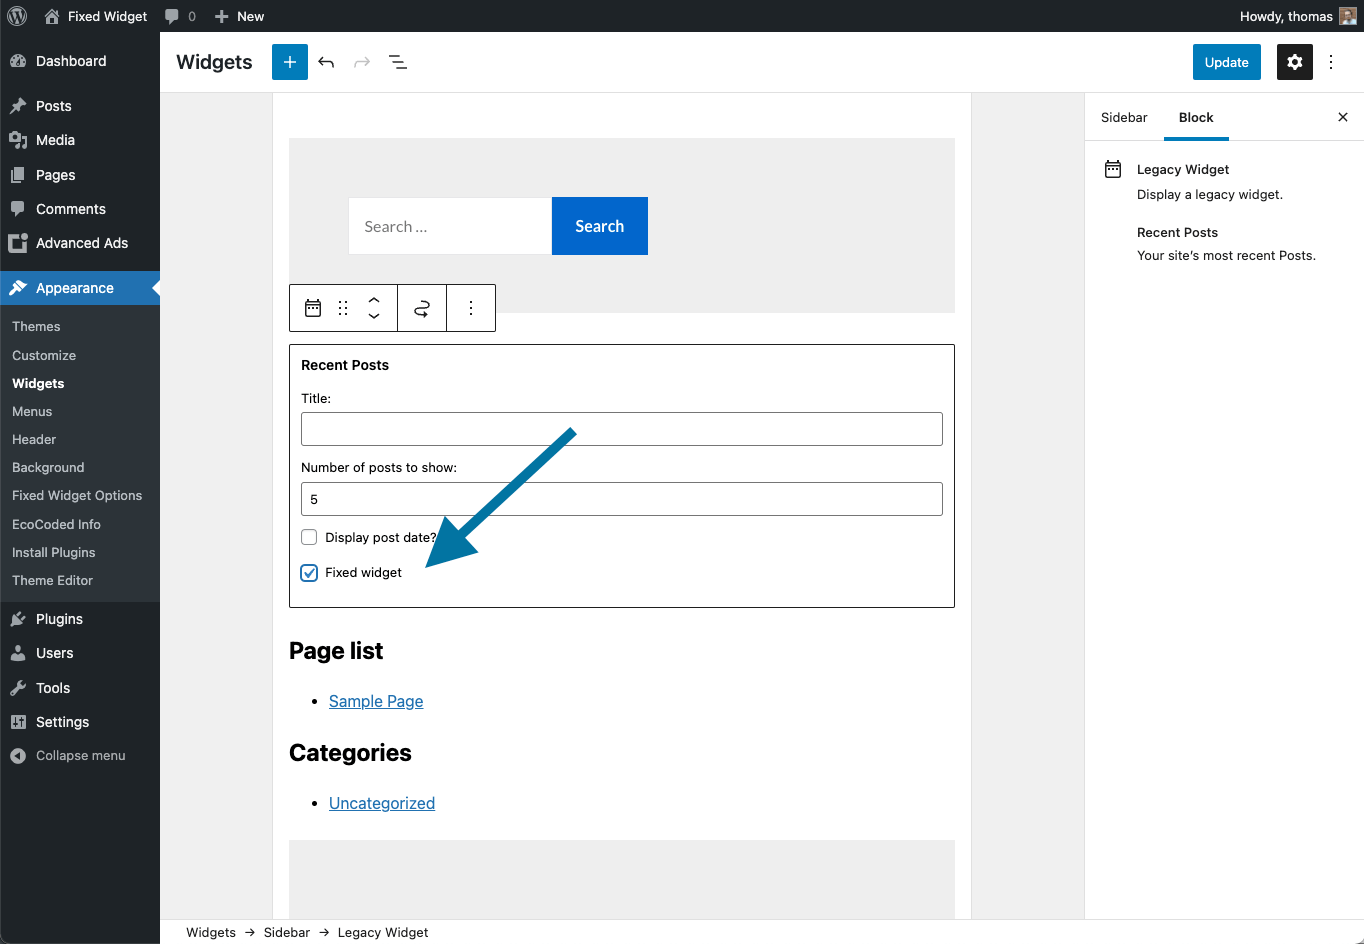
Legacy widgets from before WordPress 5.8 show the Fixed widget option in a different position, right below the other options. A stop option is not available here.
Additional Options for Fixed Widgets
Find the general plugin options under Appearance > Fixed Widget Options.
They allow you to set minimum screen width or height before the sticky feature is enabled. You can also define a margin for sticky elements related to the top and bottom of your website.
Finally, you can make any element on your website sticky with the Custom Fixed Elements option as well as any element a stop element.
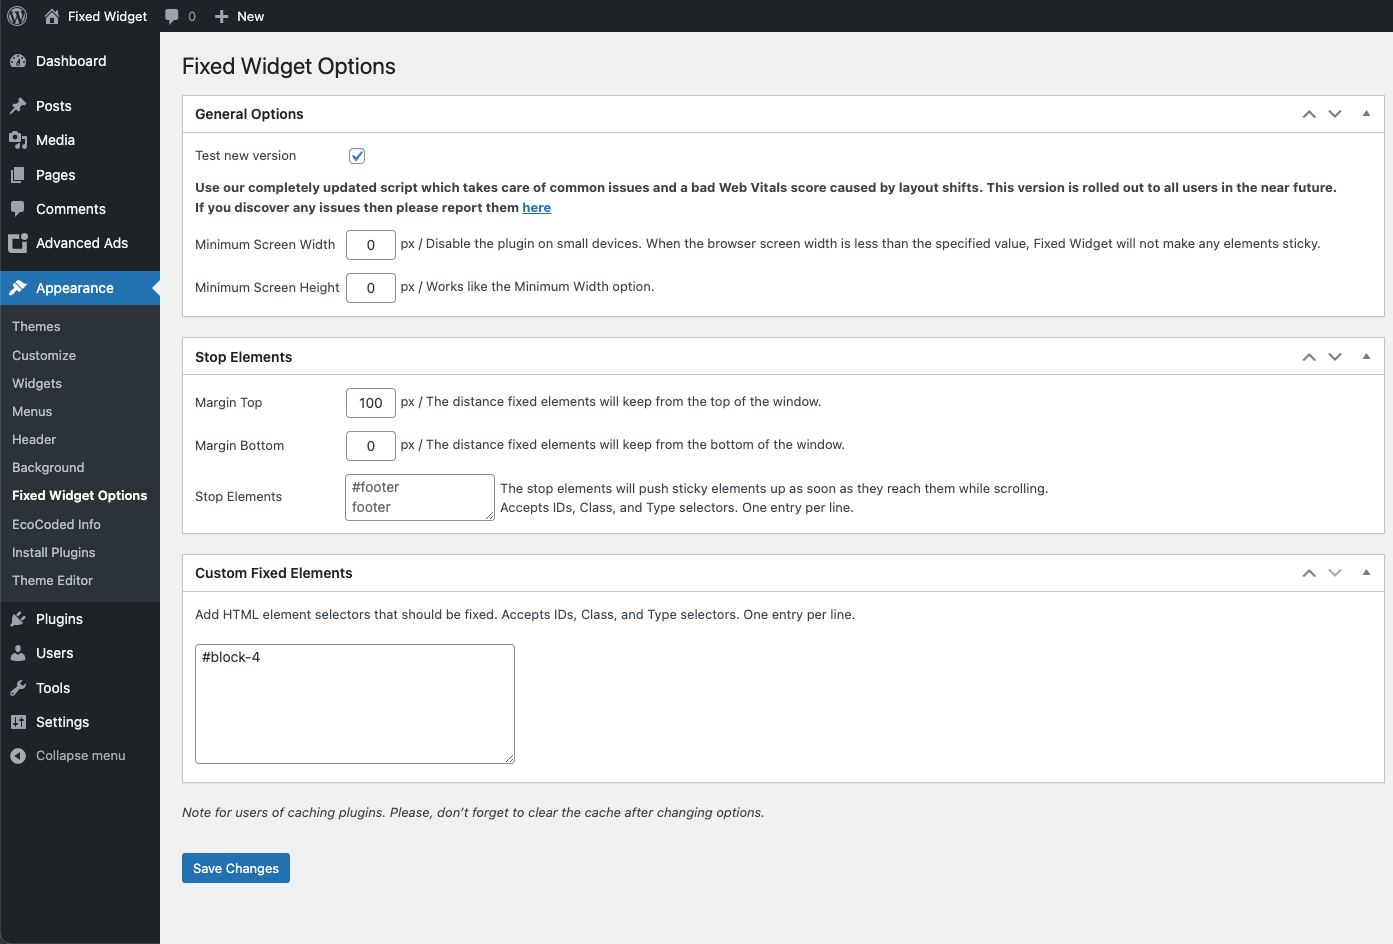
Stop Elements
The Stop Elements option allows you to define an element that pushes fixed elements further up as soon as it reaches them. E.g., you could define that your website footer pushes and fixed elements up so that they don‘t overlap the footer.
The Stop Elements option accepts multiple selectors, though only one of them will work per page.
Custom Fixed Elements
The Custom Fixed Elements option allows you to fix any element on the page. Well, almost any. Fixed Widget can only stick elements to the screen that are not limited by the size of the parent element.
Let’s take a sticky widget as an example. A single widget can be made sticky, which would fix it within the sidebar. As soon as the sidebar ends, the fixed widget would scroll away with the end of the sidebar.
The same applies to sticky elements within other areas on your website. Let’s look at an example from the TwentySixteen WordPress theme.
In the screenshot below, I highlighted the header element with the ID #masthead. This element is a child of div#page, which is stretching over the whole site. So #masthead would be sticky within that larger element and work as expected.
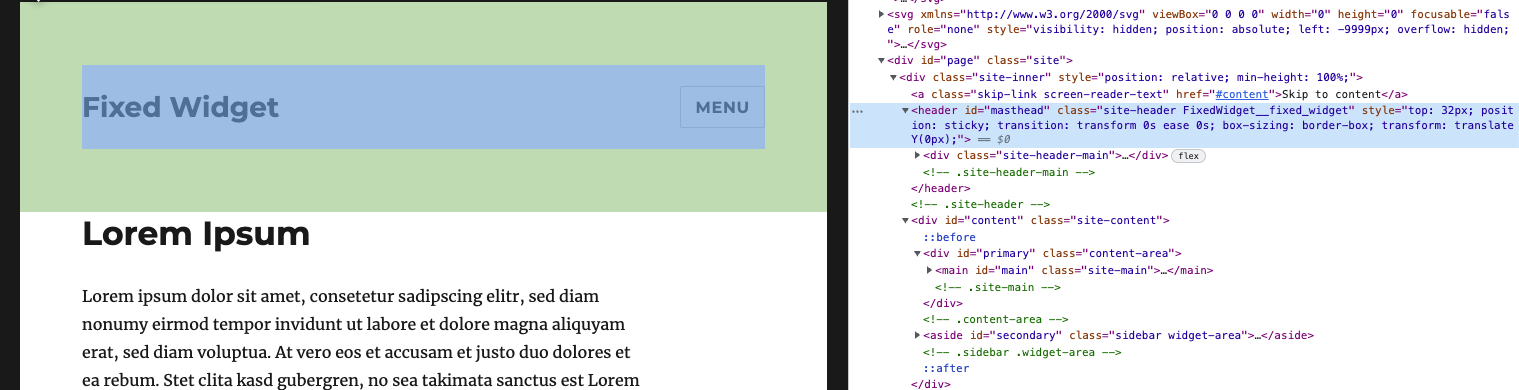
#masthead has a child element, div.site-header-main. If you would make this child element sticky, it would only be fixed within #masthead and therefore scroll away quickly.
FAQ
On the settings page, you can find two options to disable fixed widgets on mobile devices: Minimum Screen Width and Minimum Screen Height. Both work similarly. If the browser width or height is less than or equals a specified value, the sticky function will be disabled. In the same vein, you can also use the display and visitor conditions of Advanced Ads to target specific user groups with your fixed widget.
Yes, it is possible to stop the sticky behavior at a specific point. You have to know the ID or class selector of this HTML element. The fixed widget will stop being sticky at the beginning of this element. To learn how to get this selector, let’s take a look at an HTML page structure in WordPress:
<div class="content">
  <div class="article"></div>
  <div class="sidebar">
    <div class="q2w3-fixed-widget"></div>
  </div>
  <div id="comments" class="comments-section"></div>
</div>
If you want to unfix the widget when it reaches the comment section, you will need to identify the selector of the comments block. Take a look at the page structure above, it is “comments” (id="comments"). Add a line with #comments into the Stop Elements field in the plugin settings. You can use any existing HTML element for it or you create your own in your theme.
You can use the Custom Fixed Elements option to fix an element only on specific pages.
To do that, you need to find a unique HTML identifier for the given page. You will probably find one in the <body> element of the source code.
It should contain at least one element with the post ID. Like page-id-2 in the following example:
<body class="page-template-default page page-id-2 logged-in admin-bar">
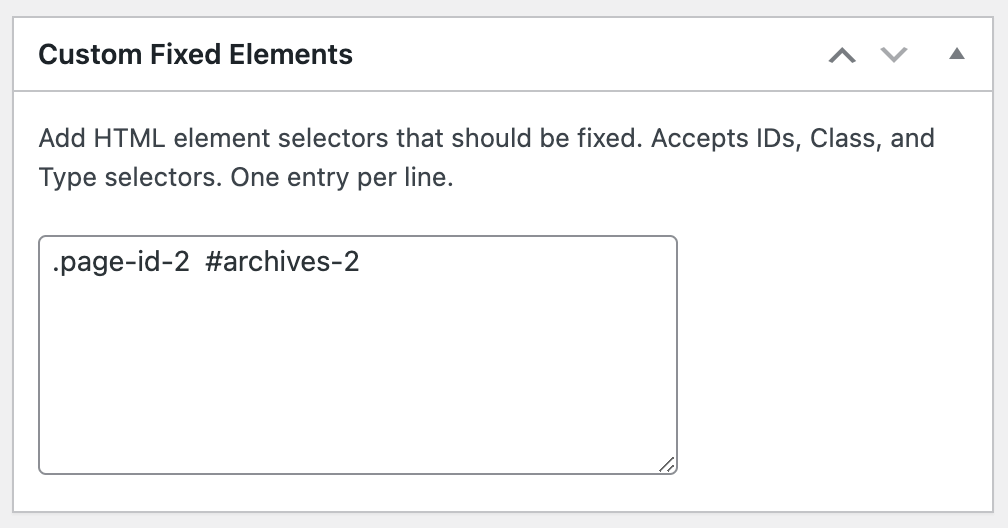
You then also need to identify the ID of the widget you want to fix, e.g., archives-2.
Now you can build the entry that goes into the Custom Fixed Elements option. In our example, this would be .page-id-2 #archives-2.
Yes, it is possible to fix more than one widget even if they are located in different sidebars. Just enable the Fixed Widget checkbox of additional widgets that should behave sticky.
Fixed elements use the class FixedWidget__fixed_widget__pinned while they are sticky.
You can use that class to apply custom CSS rules like .FixedWidget__fixed_widget__pinned {border: solid; }.
If a fixed widget is higher than the page’s content, a user can only reach the bottom of it when they scroll down the entire page.
Alternatively, you could make the widget content itself scrollable.
You could use the following custom CSS rule as a basis to make a fixed widget scrollable.
.FixedWidget__fixed_widget__pinned {
overflow-y: scroll;
max-height: calc(100vh - 50px);
}
Changes in version 6.0.0
Version 6.0.0 of Fixed Widget is a full rewrite of the frontend script. It fixes many edge cases like jumping, reloading, or resizing widgets.
The rewrite also resolves bad Cumulative Layout Shifts.
Enable “Test new version” under Appearance > Fixed Widget Options.
- the frontend script does not need jQuery anymore
- removed unneeded options that previously helped resolving edge cases
- “Stop Elements” and “Custom Fixed Elements” now accept any selector, including IDs, Class, and Type selectors.
- works with the widget block editor introduced in WordPress 5.8
- added “stop” option to widget blocks
Please test and let us know if you discover any issues.
Troubleshooting
Before you troubleshoot, make sure to enable Test new version under Appearance > Fixed Widget Options to see if our in version 6.0.0 rewritten logic is already solving your issue.
There are several reasons why the Fixed Widget for WordPress plugin doesn’t work.
- Javascript errors on the website. To resolve this, check the console of your browser. If you find any errors, try to locate them and fix their source or contact the plugin or theme developers.
- The functions
wp_head()andwp_footer()are not present in the template. Check theheader.phpandfooter.phpfiles of your active theme. - Incompatibilities with your theme’s CSS
- The website uses AMP, which removes custom JavaScript
- Another plugin, theme, or custom code introduces sticky behavior as well, which causes a conflict with Fixed Widget. Remove that other feature to solve it.